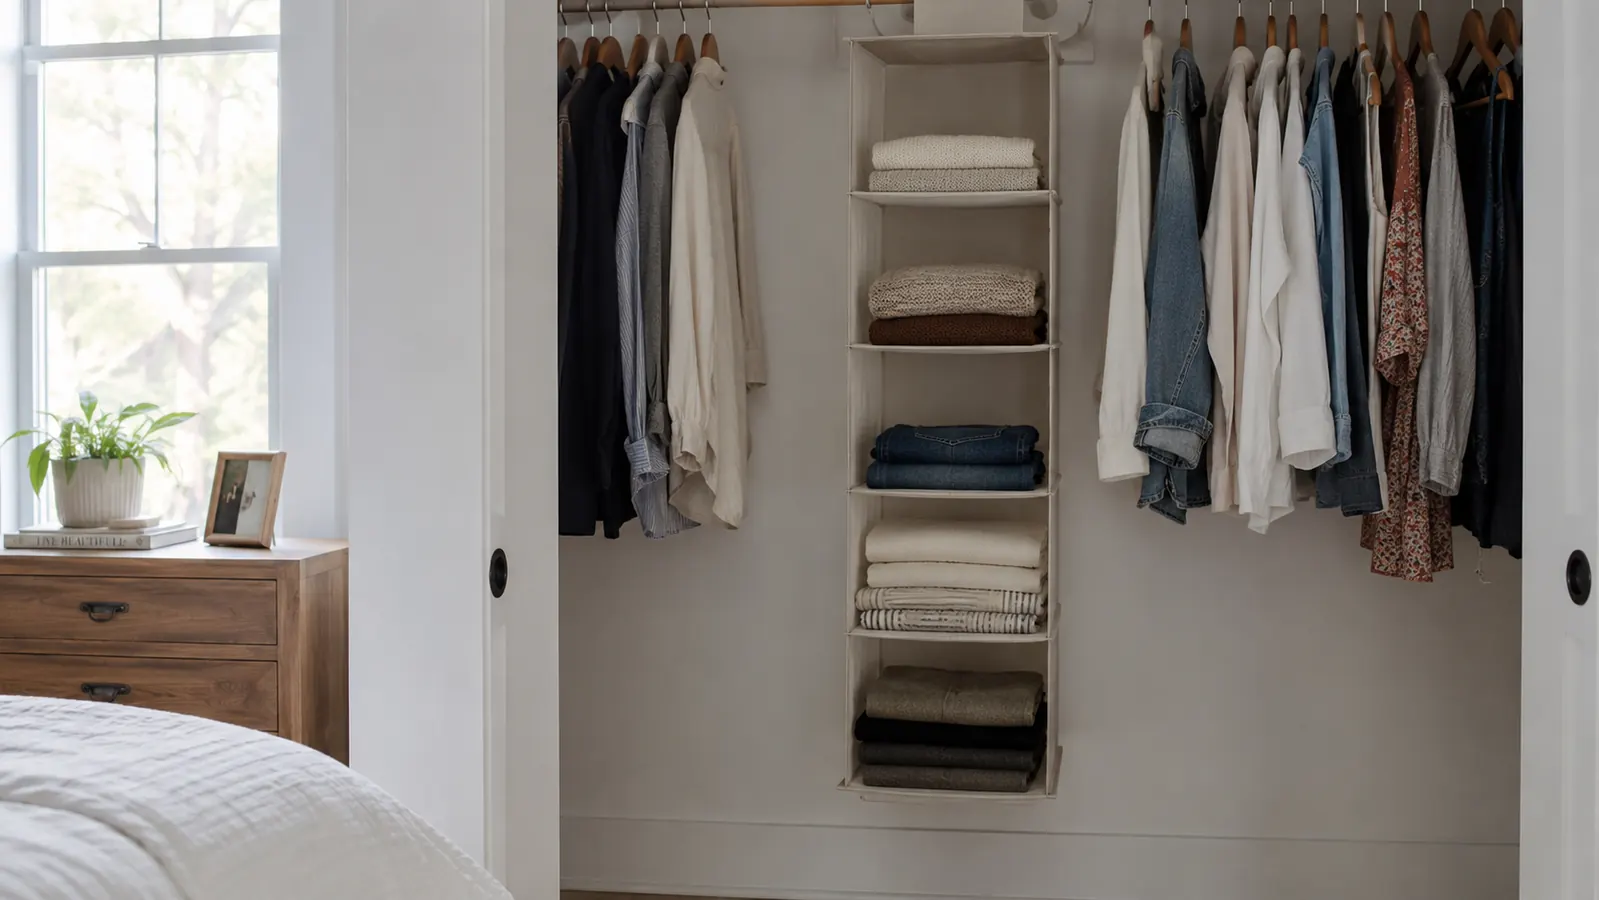
If you have opened your closet this week and immediately felt your shoulders tighten, you are not alone. Most bedroom closets were designed with a single rod and maybe one shelf above it, and that is it. Everything piles onto the floor, sweaters tower in unstable stacks, and the stuff you actually need ends up buried behind the stuff you forgot you owned. I reorganized my own closet three times before I figured out the real problem: I was not short on floor space. I was short on vertical space. The hanging shelf is what finally fixed it.
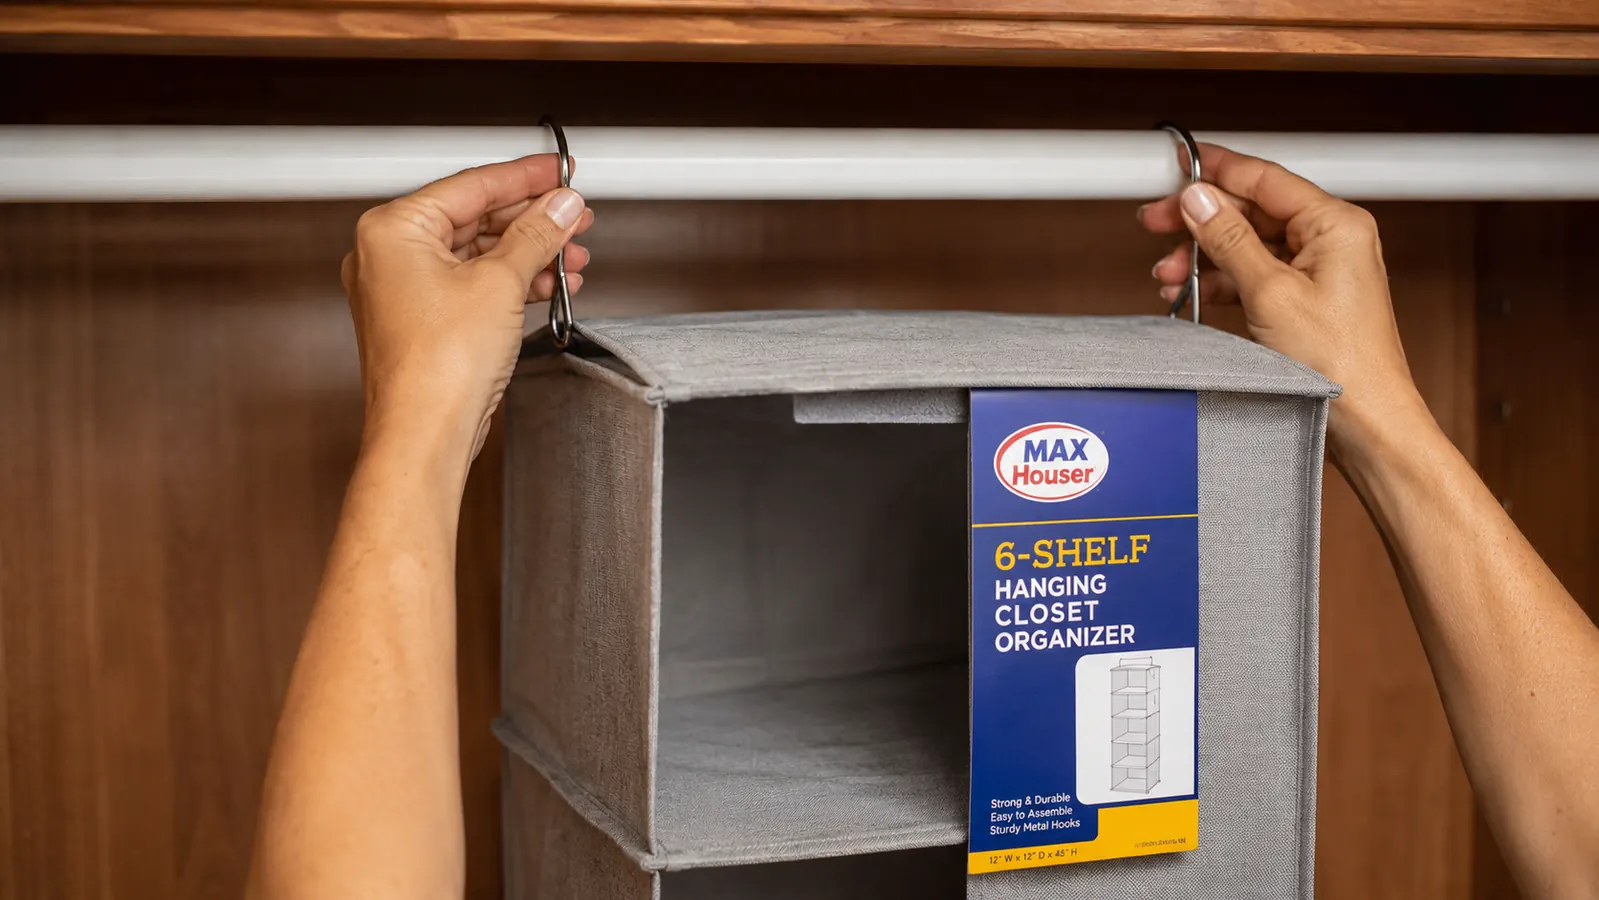
A hanging closet shelf clips onto your existing rod and drops six tiers of storage straight down into the dead air below your hanging clothes. No tools, no drilling, no new furniture to buy. The MAX Houser 6-tier hanging closet organizer is the one I have used in my own closet and in two of my kids' closets, and it costs less than most candles. But where you hang it and how you load it matters more than people expect. This guide walks through every step so you get the full benefit from day one.
Your closet rod already has the space. This shelf uses it.
The MAX Houser 6-tier hanging closet organizer hooks onto any standard rod in under a minute. No tools, no installation, no floor space lost. Over 14,000 reviewers agree it works.
Amazon Check Today's Price on Amazon →Step 1: Measure Your Rod and Identify Your Dead Zone
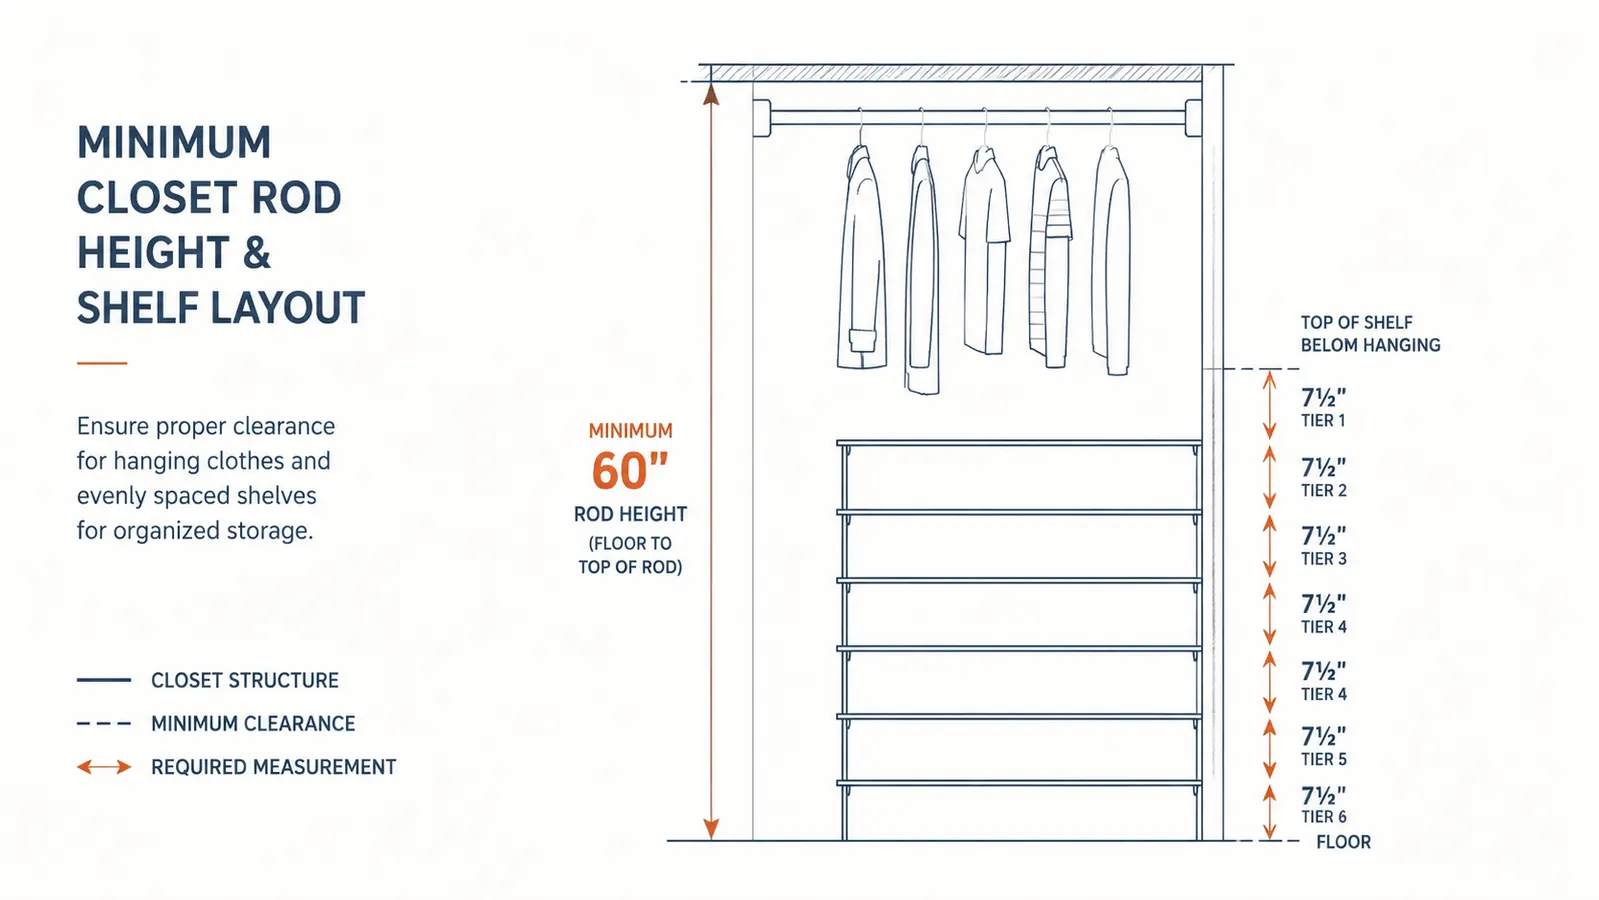
Before you order anything, stand in front of your closet and look at the space between the bottom of your hanging clothes and the floor. That gap is almost always two to three feet of completely unused air. That is your real storage problem, and it is also your solution. Grab a measuring tape and note the height from the floor to the bottom hem of your shortest hanging items. You want at least 18 inches of clearance below the clothes for a six-tier shelf to fit without crowding.
Also measure the rod itself. Standard closet rods are either round or flat. The MAX Houser hooks are curved and fit snugly on round rods between 5/8 inch and 1.5 inches in diameter, which covers almost every builder-grade rod out there. If you have a flat closet bar (common in some wire-shelf systems), check that the hook opening is wide enough before you commit. Mine fit every rod I tested, but it is worth confirming so you are not troubleshooting on a Tuesday night.
Finally, decide where along the rod you want the shelf to hang. Most people push it to one end so it does not interrupt their hanging clothes run. A better approach: look for the natural gap in your wardrobe, the stretch of rod where clothes are thinnest or where you have been storing nothing at all. That is usually the right spot, and it keeps the shelf from bumping into everything else every time you reach for a shirt.
Step 2: Hook the Shelf and Check the Stability
Take the shelf out of the packaging and hang it with both hooks over the rod at the same time. Do not try to hook one side at a time and then swing the other side up. That puts an awkward twist in the frame and makes the whole unit sit crooked. Lift both hooks together, set them over the rod simultaneously, and let the weight of the shelf settle. You will feel it land level. Takes about fifteen seconds once you get the angle right.
Give it a gentle tug side to side. It should not slide easily along the rod. If your rod is smooth and the shelf migrates over time, a simple fix is two rubber shelf liner squares on either side of the hooks. Cut them about two inches wide and slip them between the hook and the rod. They grip the rod without scratching it and the shelf stays exactly where you put it. My daughter's closet rod is very smooth and this is the only tweak I had to make.
Check that the shelf hangs plumb. If it leans forward or backward, it is usually because the hooks are not sitting fully over the rod. Lift the whole unit off, reseat both hooks at the same time, and let it settle again. A level shelf makes a real difference when you start loading it. Tilted shelves cause things to slide forward and fall out, which gets old fast.
Step 3: Assign Each Tier Before You Load Anything
This is the step most people skip, and it is the reason their shelf turns into a jumble within a week. Before you put a single item on the shelf, decide what category goes on each tier. Write it on a sticky note and tape it to the side of the shelf while you load it. You do not have to keep the sticky note forever. It just keeps you from making random decisions in the moment and ending up with a mixed-up shelf that nobody wants to dig through.
A simple rule that works in most closets: heavy or bulky items go on the bottom two tiers (jeans, heavier sweaters, shoes that fit), medium items go in the middle (lighter folded tops, small accessories in a shallow bin), and quick-grab everyday items go on the tier closest to eye level for whoever uses this closet. For a kid's closet, that means putting the items they actually reach for at a height they can reach, which is one of the best things you can do for making them responsible for their own space.
Assign each tier before you load it. That one step is the difference between a shelf that stays organized for months and a shelf that becomes a pile in two weeks.

Step 4: Load the Shelf and Respect the Weight Limit
The MAX Houser is rated for about 11 pounds total across all six tiers. That sounds like not much until you realize folded clothing is light. A stack of four folded t-shirts weighs maybe a pound. A pair of sneakers might be two pounds. You have more capacity than you think for typical clothing and accessories. Where people run into trouble is when they try to use the shelf for heavier items: a full stack of denim, a winter coat, a pile of textbooks. Keep the heavy, dense stuff in drawers or on fixed shelves and let the hanging shelf do what it does best.
Load from the top down. If you pile everything on the bottom first and then add weight above, the shelf can bow slightly at the lower tiers. Starting from the top and working down keeps the load distributed evenly and the frame sitting straight. Use small open bins on a tier if you are storing loose small items like socks or hair accessories. Loose small things on an open fabric shelf have a way of walking to the edge and falling, so containment helps a lot.
Leave one tier deliberately light or partially empty. Counterintuitive, I know. But a shelf with one spare tier gives every member of the household a natural place to land something temporarily without ruining the whole system. When there is no spare space, people set things on top of other things, stacks form, and the whole thing deteriorates. One breathing-room tier is surprisingly good maintenance strategy.

Step 5: Do a One-Week Check and Adjust
Come back after seven days of real use and look at the shelf honestly. Are there items that keep ending up on the wrong tier? Move them. Is one tier overloaded while another is empty? Redistribute. Is the shelf staying level or has it developed a lean? Reseat the hooks. The first week of use tells you more about your actual habits than any planning session does, and small adjustments made early stick much better than trying to overhaul a system after it has drifted for a month.
Also check the hanging clothes situation. Sometimes the shelf ends up positioned right where you keep reaching for clothes, and every grab bumps the shelf slightly. If that is happening, slide the shelf a few inches in either direction along the rod. A small position change often eliminates friction entirely. The beauty of a hanging shelf is that it repositions in about four seconds, so you can keep adjusting until it feels completely natural.
If you added the shelf to a shared closet or a kid's closet, now is the time to check in with the other person. Ask them what is working and what feels annoying. Reorganization only sticks when it works for the actual people using the space, not just for the person who set it up. A small tier reassignment that makes the system easier for your seven-year-old to maintain is worth more than a perfectly planned layout they ignore.
What Else Helps
A hanging shelf solves the vertical storage problem beautifully, but if your closet has other issues, a few small additions round out the system. Slim velvet hangers instead of thick plastic ones free up four to six inches of rod space, which is often enough to create the clear gap where the hanging shelf works best. A small over-the-door pocket organizer on the inside of the closet door handles belts, scarves, and small accessories that used to live in a tangled pile on the shelf. And if shelf dividers feel relevant for your setup, they pair well with a hanging organizer by keeping folded stacks on your fixed shelf from toppling into the hanging shelf space. For a deeper look at how hanging organizers and shelf dividers compare, the guide at hanging closet organizer vs shelf dividers breaks down exactly when each one solves a different problem. And if you want to understand the MAX Houser in more detail before you commit, the full long-term review at hanging closet organizer review covers six months across multiple closets.
The hanging shelf your closet has been waiting for.
The MAX Houser 6-tier hanging closet organizer installs in under a minute with no tools and no drilling. Six tiers of storage, rated 4.6 stars by over 14,000 buyers. Check today's price before you start Step 1.
Amazon Check Today's Price on Amazon →